Project 1. On site Sketching and Tonal Values.
We were required to choose 4 places (2 interior and 2 exterior) in the campus and sketch the view on site. We also had to rendered our drawings. I rendered it my way by smoothing out the pencil with a paper blender. I found it much more comfortable using that way.
For this project, I learned that I still need to improve my skills on drawing on site. I found it very difficult to draw on site because first, it takes alot of my time to sit there and draw. Second, I can't get the proportion or scale right. So to overcome that problem, I took a picture of my angle and view of the space and draw it at home. But basically, I realize that I have a lot of practice to do on drawing on site. I think that its really important to learn how to draw something from the moment you look at it. I think that its a very important skill for architects. I also have to work on my rendering skills. I have to learn other techinques to render so that I can be more exposed with other skills. Also, most importantly, workmanship is key to all works. I learned that my workmandship need to improve a whole lot more so that I can submit a clean and neat work. But overall, I am very proud of the outcome I created. This is the first time that I had drawn something at this level. I am actually really happy of my work and hope to be much better for the future. |
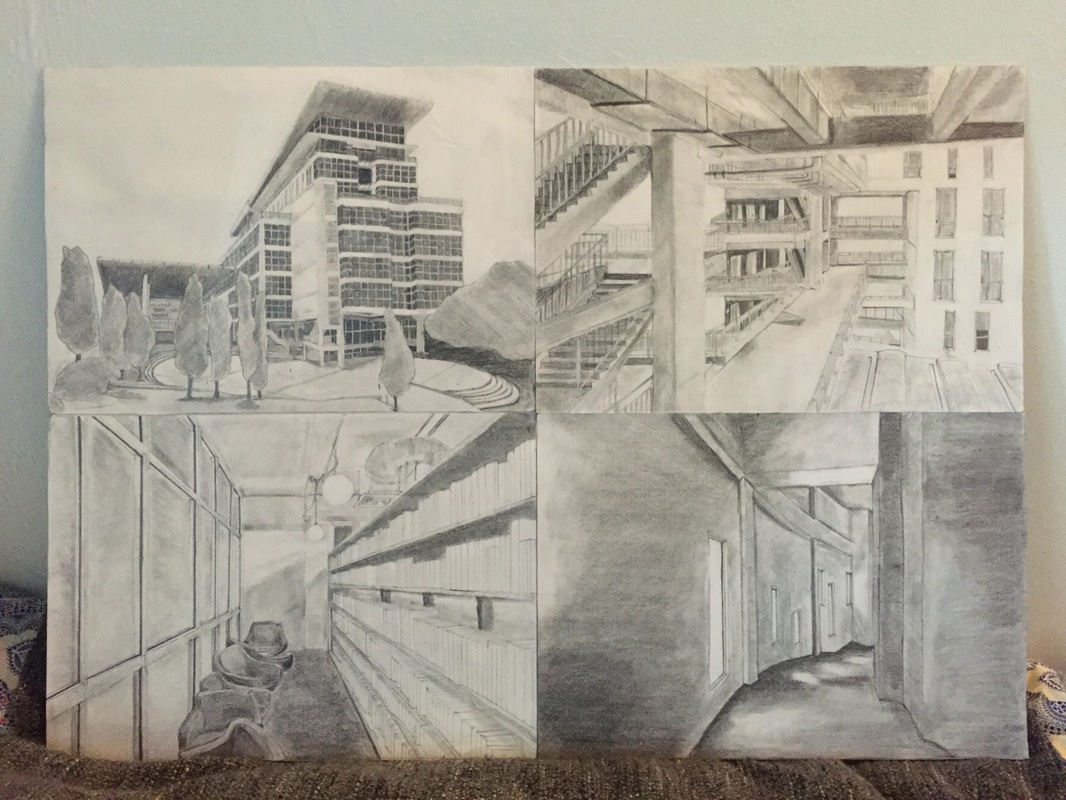
The 4 sketches of Taylors University Lakeside Campus.
|
Project 2A (Part 1). Orthographic Drawings.
|
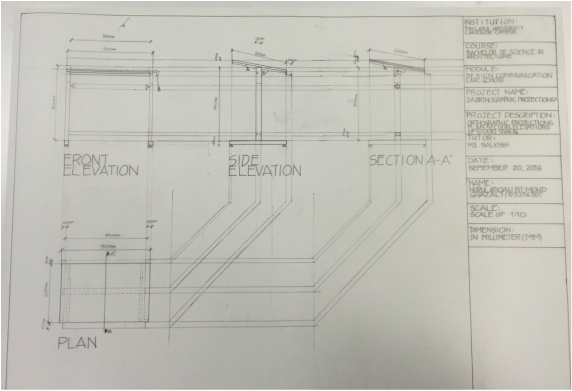
ORTHOGRAPHIC DRAWINGS.
For this project, we are learning about orthographic drawings. The first part of this project is to draw our studio table. From this project, I learned about projection lines. I learned that they are thin lines that connects to the next drawing. And this shows how each drawing is connected to each other. For this project, I used my first technical pen, Rotring pen to be exact. I struggled alot in the beginning and made a lot of mistakes. I always smudge the ink and ended up doing everything all over again. But I practice alot of times before the submission date and that helped me learn how to use the pen properly. I did my work at the studio and I was able to do work more faster and not get distracted with any other things. Also, I learned that line weight of the pen is so important to show what is far and what is near. And the technical really helps show that different line weight compared to normal Artline pens. |
Project 2A (Part 2).
|
ORTHOGRAPHIC DRAWINGS.
For this project, we had to study a building called "Esherick House". And we had to create a study model so that it could help us with the drawings. So we had to make all the orthographic drawings: Plan, elevations and sections. For this project, I had improved a bit more with my lineweight. I learned how to draw orthographic drawings for a 2 storey house. I learned that for section, everything that I cut will through will then just color in black. I also learned that workmanship is seriously important. So it is very important to not do the drawings last minute and do it earlier so that you will slowly ink it in a neater way. So basically, working with technical pen takes a lot of patience and time. Its not something that you can do in last minute. |
|
Project 2B.
|
|
AXONOMETRIC DRAWINGS.
For this project, we are still working with the Esherick House. But this time, we are drawing axonometric. I chose to do the 45-45 degrees axono. This project taught me again on how workmanship is crucially important. To avoid messy work, I would have to work on it earlier so that I dont rush when inking it. And I realize that I always rush with inking it and that creates alot of error and smudging. But more importantly, I learned how to draw axonometric. Full axono and an exploded axono. I actually find it fun to draw axonometric because the outcome of it is really interesting. I love the idea of something exploded and getting a look on what is inside. its like a house being dismantle or being put back together. I also learned that if you don't know how to draw certain parts of the house, an easy way to solve this is to google images of the house and look at how it actually looks like. This will give you an idea of what the drawing would look like. Because sometimes, the orthographic drawings that are given is not enough. |
Project 2C.
|
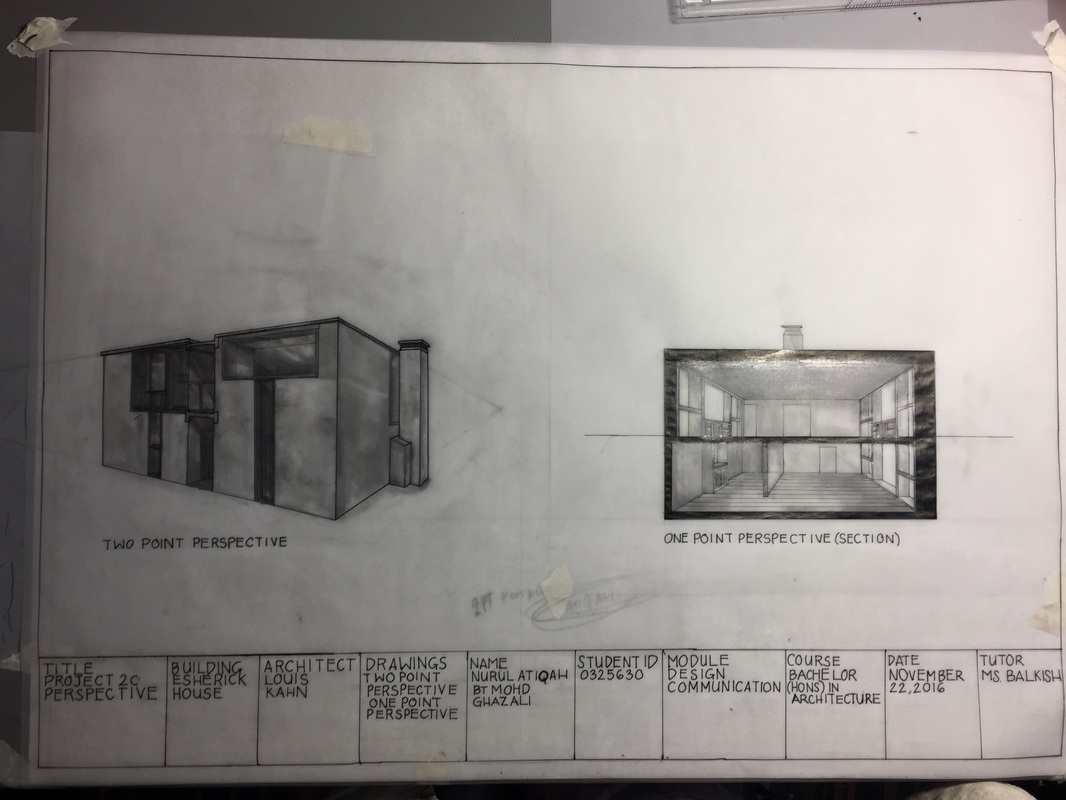
PERSPECTIVE DRAWINGS.
For this project, we had to draw a 2 point perspective of the Esherick house and a 1 point perspective of the interior. This project had really improved my drawings on perspective. I didnt know that there was a way to draw perspective from a plan drawing. I always thought that perspective drawings are sketch drawings. But there is actually more to that. Basically I learned that there is steps that we have to go through in order to draw a perfect perspective. I found 2 point perspective to be a whole lot easier that I imagine. I also about drawing one point perspective from a section. It was my first time drawing a perspective for a two storey house. I did find it difficult but I manged to draw it with the help of my tutor and friends. This project also brings back my rendering skills. I was still not comfortable with rendering it with a pen, so I go to what I prefer more, which is pencil. But I realize that my rendering was not that bold enough. It didnt really create that sense of dept for the drawing. But overall, I think that I have benefit alot from this project. |
|
Project 3 (Integrated with Studio 1).
|
|
This project is integrated with our final project for Architecture Design Studio 1. Basically, for whatever we are designing for that project, Design Communication will mark the drawings. The drawings include: Plans, Elevations, Sections, and Perspective or Axono.
The projects before this had helped me alot for this last one. All the things that I learned from the Esherick House drawings had me improve my drawings fro this one. I found it a bit more easier to draw because it is based on my design and I know more about my design and how I want it too look like. The difficult part was to draw exactly how the thing is. For example, I had a bit of a struglle on how to draw a slide or stairs. So I had to google those things up and figure out how to draw them for plan or elevation. But I can say that my workmanship had really improve for this project. I didnt feel rush at all because I had done many practice drawings on tracing paper before I did it on the actual board. It helped me avoid mistakes and errors. To be honest, I had a really good time drawing my own design because it brings out my idea out and helps express the message I wanted to convey. I think that this project had me feel really grateful for all the past projects. Rotring pens really saved my life. I thought that rotring pen only worked on tracing paper until I tried it on craftboard. It actually worked the same and didnt even ruin the pen. And I was so proud of the outcome! |
Course Reflection.
For this whole course for this semester, I learned that workmanship is very very important. Workmanship can really bring your grade down from a B to a C. And I have experience that. Other than workmanship, line weight is also really important. In order to get perfect line weight for your drawings, you have to get a good quality pen with vary lineweight such as : .5, .3, .2, .1. I used Rotring pen throughout this whole semester and I will continue using it in the future. The third most important thing that I learn from this course is not to come to every tutorials and show your works to your tutor. Showing your works to your tutor would really save you from a lot of mistakes. Your tutor is there to help you so come to class with something and let them help you. Even though I came to all classes, I would have times that I didn't show my work because I was either not done with my work or because I was just shy. But I learned that I had to get rid of that mindset and show my work to my tutor. I will improve a whole lot more in the future! Overall, I enjoyed this course and had so much fun with it!
